0-V is a beloved character of mine. I came up with them sometime in early 2023, and by the end of the year I was making my first ever hand-made cosplay. A few years up to this point, six specifically, I had been going to the Cleveland Comic-Con and taking low effort or store-bought cosplays for a few years. But this is a character I wanted to bring to life.
For a bit of context on 0-V (pronounced zerovee), they are a Five Nights at Freddy’s animatronic, with the appearance of a cyan velociraptor. I made a rather complicated set of lore to accompany them, that I won’t hold your attention for. They were a prototype originally made with the intent of pushing limits, limits that were pushed to their fullest, resulting in a rather dysfunctional animatronic that would soon be abandoned.

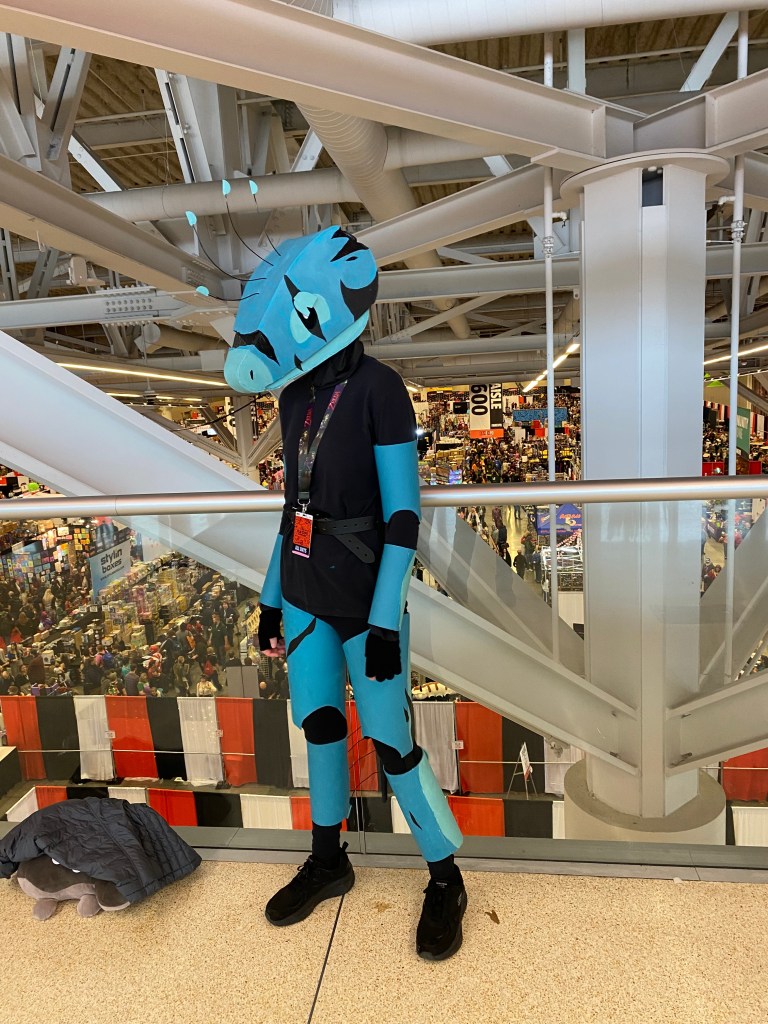
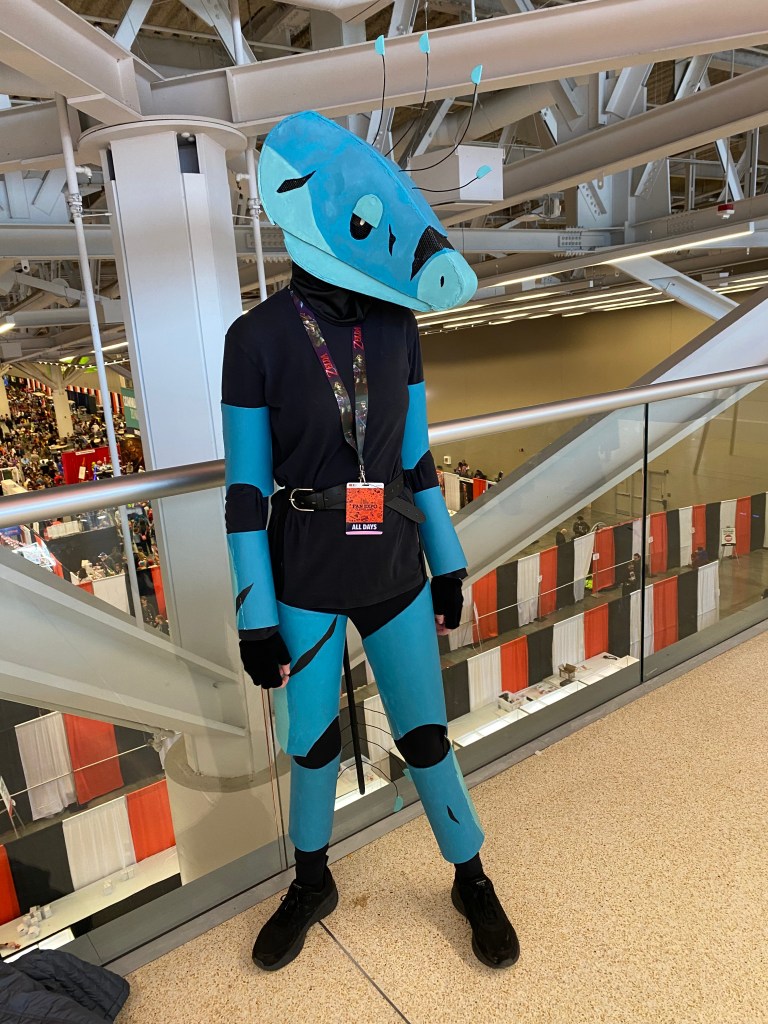
0-V’s cosplay has been retired as of November of 2025, after it had endured three conventions with plenty of battle scars. While I love this cosplay, it was the first one I ever made and it does show. My skill has improved vastly from when I created him, and I see no point in taking him to a convention when I have much higher quality cosplays I could take instead. 0-V’s debut was at the 2024 Cleveland Fan Expo, which was a convention I failed to enjoy due to the complexity of wearing a low visibility and ventilation cosplay for the very first time. This first iteration had flat pieces of painted EVA foam that I slid onto my arms and legs with elastic bands to mimic arm or leg pieces. This was a mistake. I do not recommend doing this in any case if possible. The elastic bands became unbearable to wear after about thirty minutes of me being suited up. And the ventilation was the equivalent of being in a box full of steam from the humidity of my breath, which was a problem I solved for the next convention:
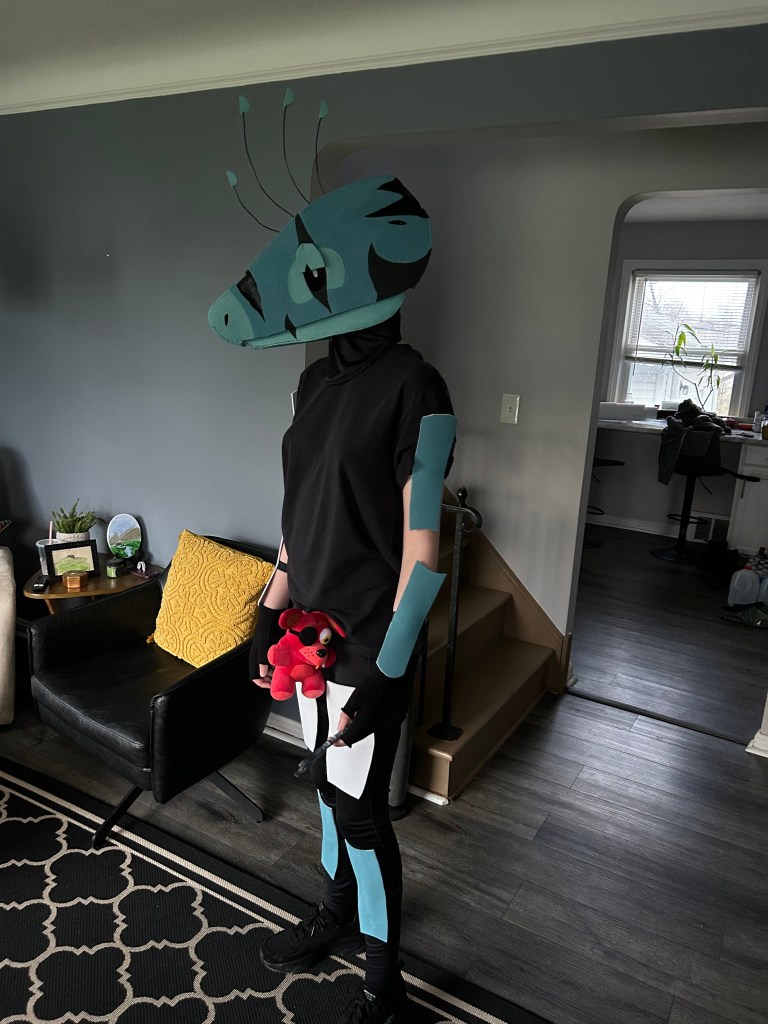
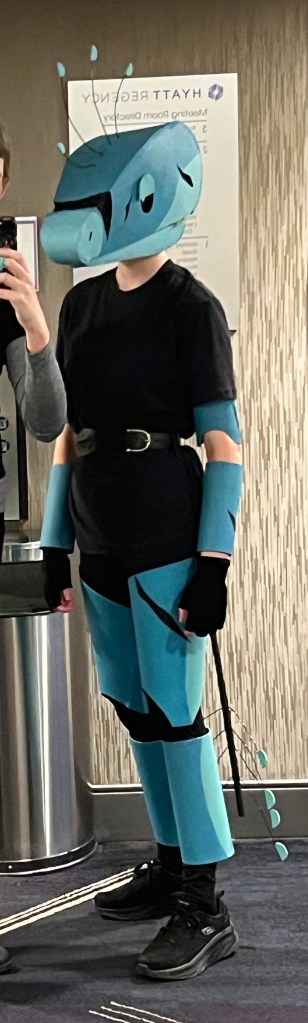
GalaxyCon Columbus 2024 was the second con 0-V visited. By now I had learned from my mistakes and instead decided to remake the arm and leg pieces as shaped EVA foam cylinders, that were held up with the famous cosplay contraption of elastic bands down the side with a belt looped through the top. The arm pieces were held on with polyfill stuffing, that filled out the space between the piece and my arm until it stayed up. It was not very comfortable, but it was better than the elastic. I improved ventilation by cutting a big hole into the lower jaw and filling it in with mesh that I then painted. This convention, I was able to enjoy. Thoroughly. Though, about an hour in, I felt a strange slimy sensation on my upper arms. I had worn a short sleeve shirt, so the arm pieces were on my skin. And…I painted the inside of the arm pieces black. It turns out, my sweat and the motion of me moving around, had begun to melt off the acrylic paint that lined the inside of the arm pieces and was slowly dying my skin.
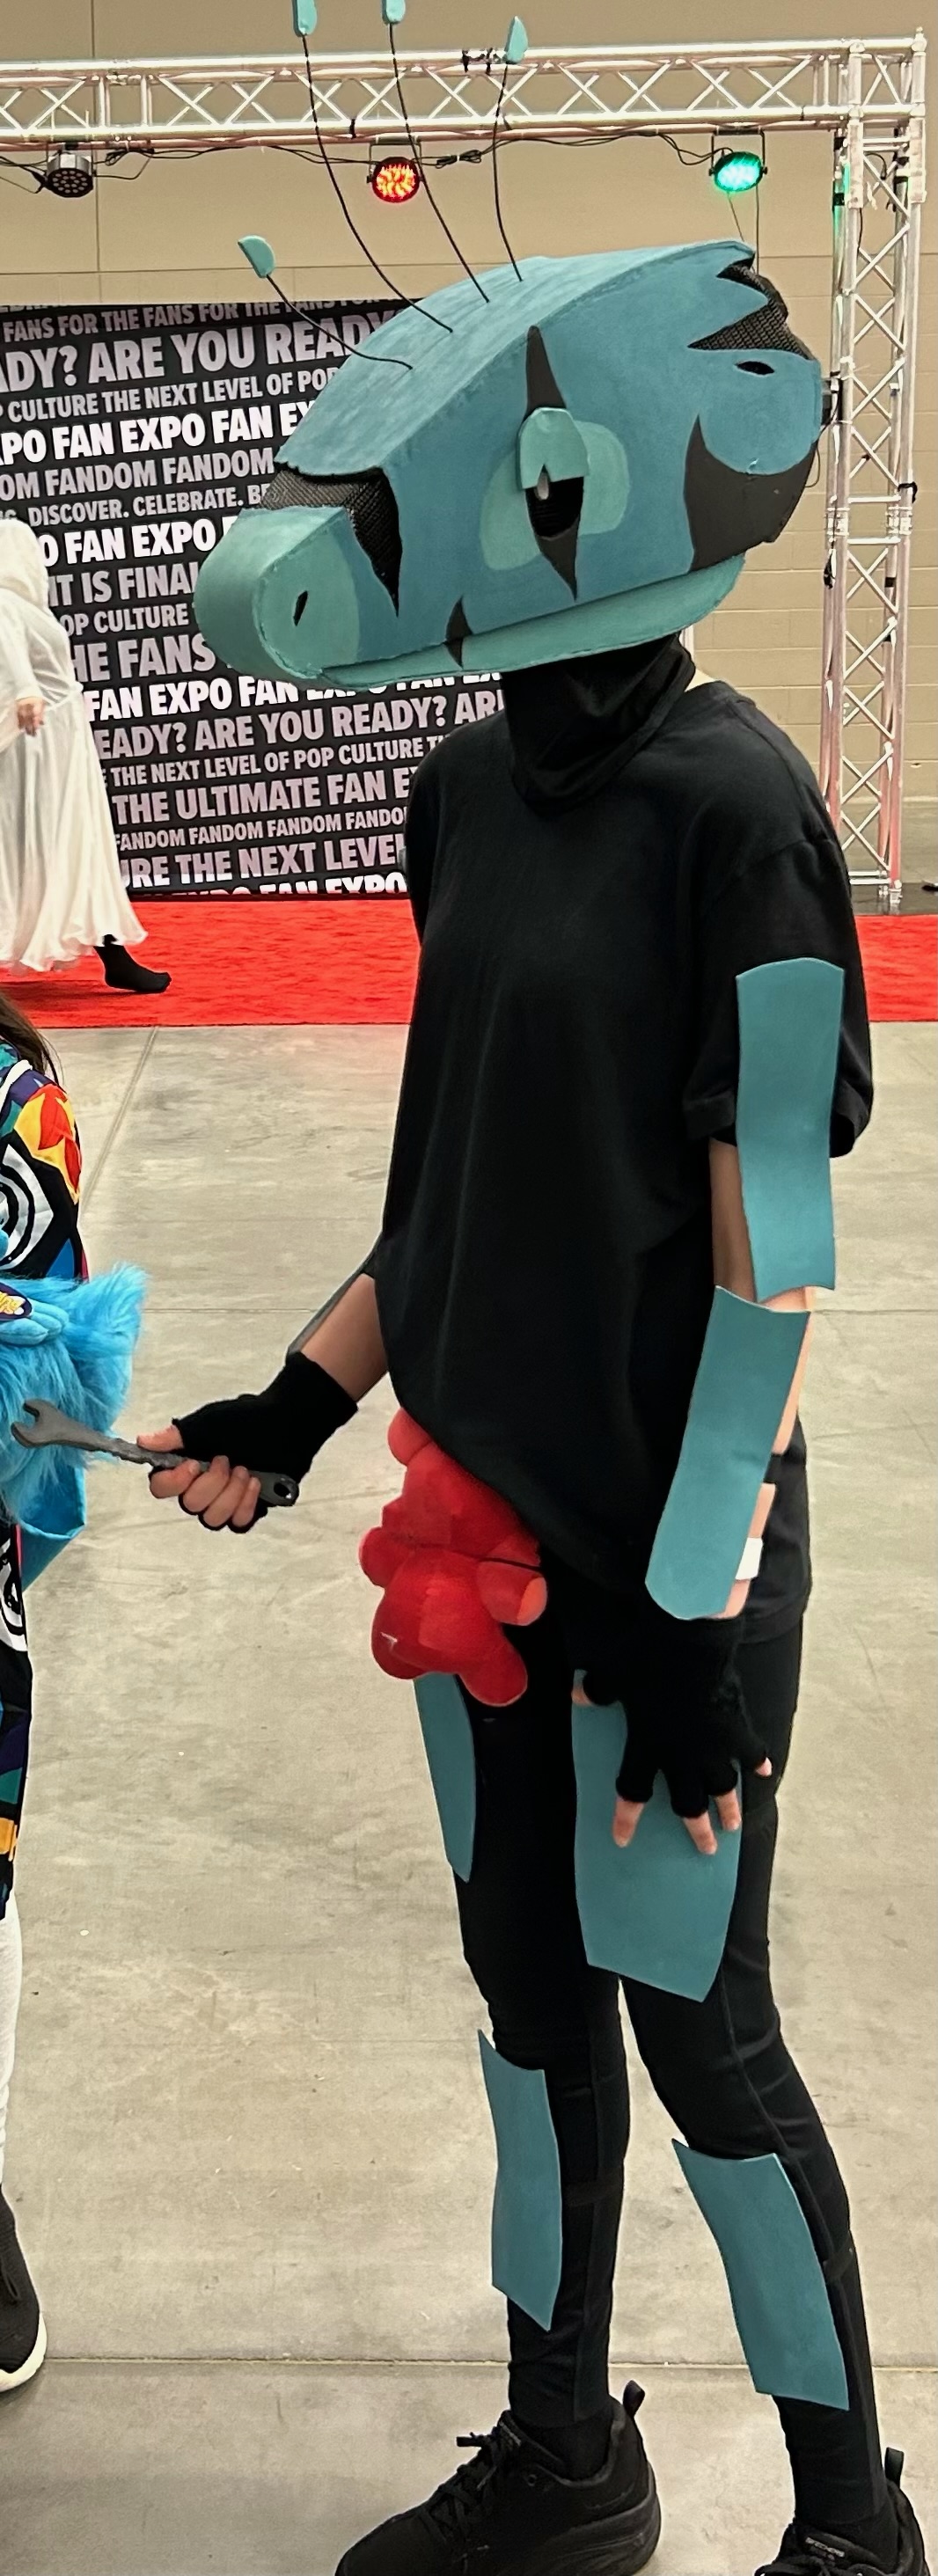
So for his final convention, Fan Expo Cleveland 2025, I wore a long sleeve shirt underneath the arm pieces. And finally, I had perfected wearing 0-V. I took 0-V on the Saturday, which is when David Tennant was starring at the convention…so parking was a huge problem. After circling around the convention no less than five times, we did manage to park, though it was about a block away. And me and my cosplay handler had to carry all of 0-V’s cosplay to the convention grounds. This wouldn’t be an issue, except for the fact that it was a windstorm, and his leg pieces were obnoxiously flapping around. We did survive in the end, though it was a battle hard-fought. Later that day 0-V got to walk the red carpet photoshoot! An amazing finale to his convention career, I feel.
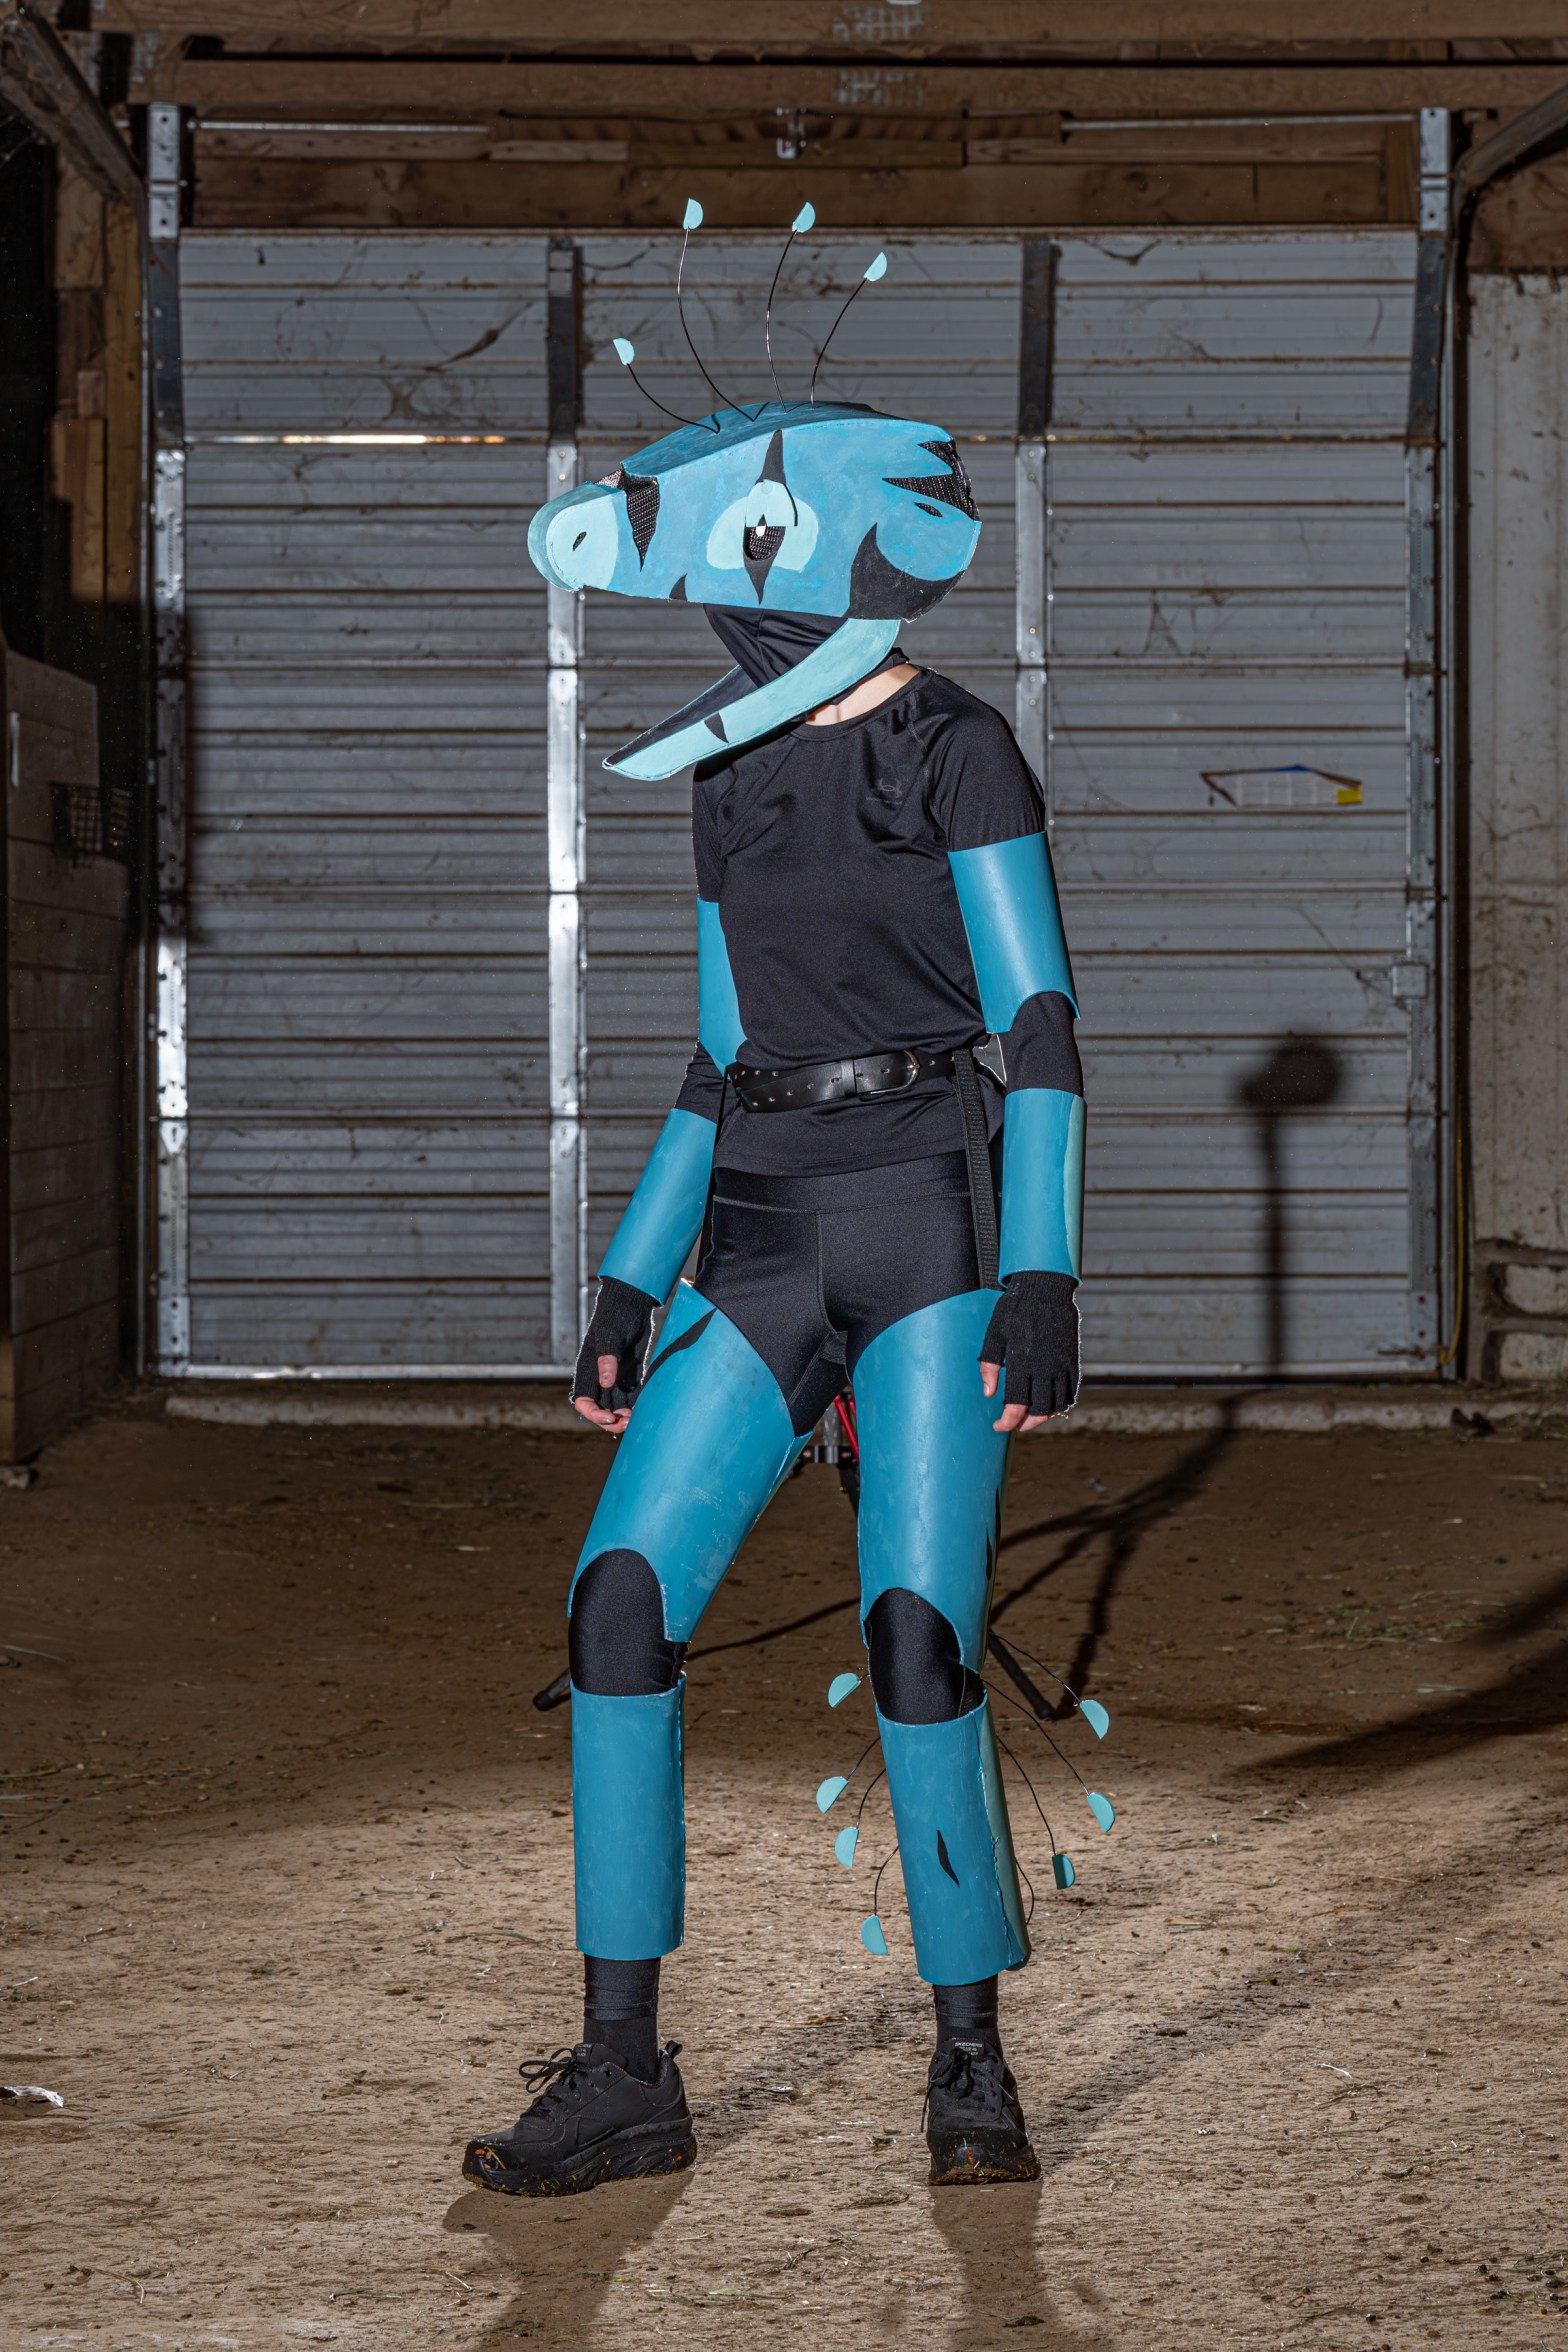
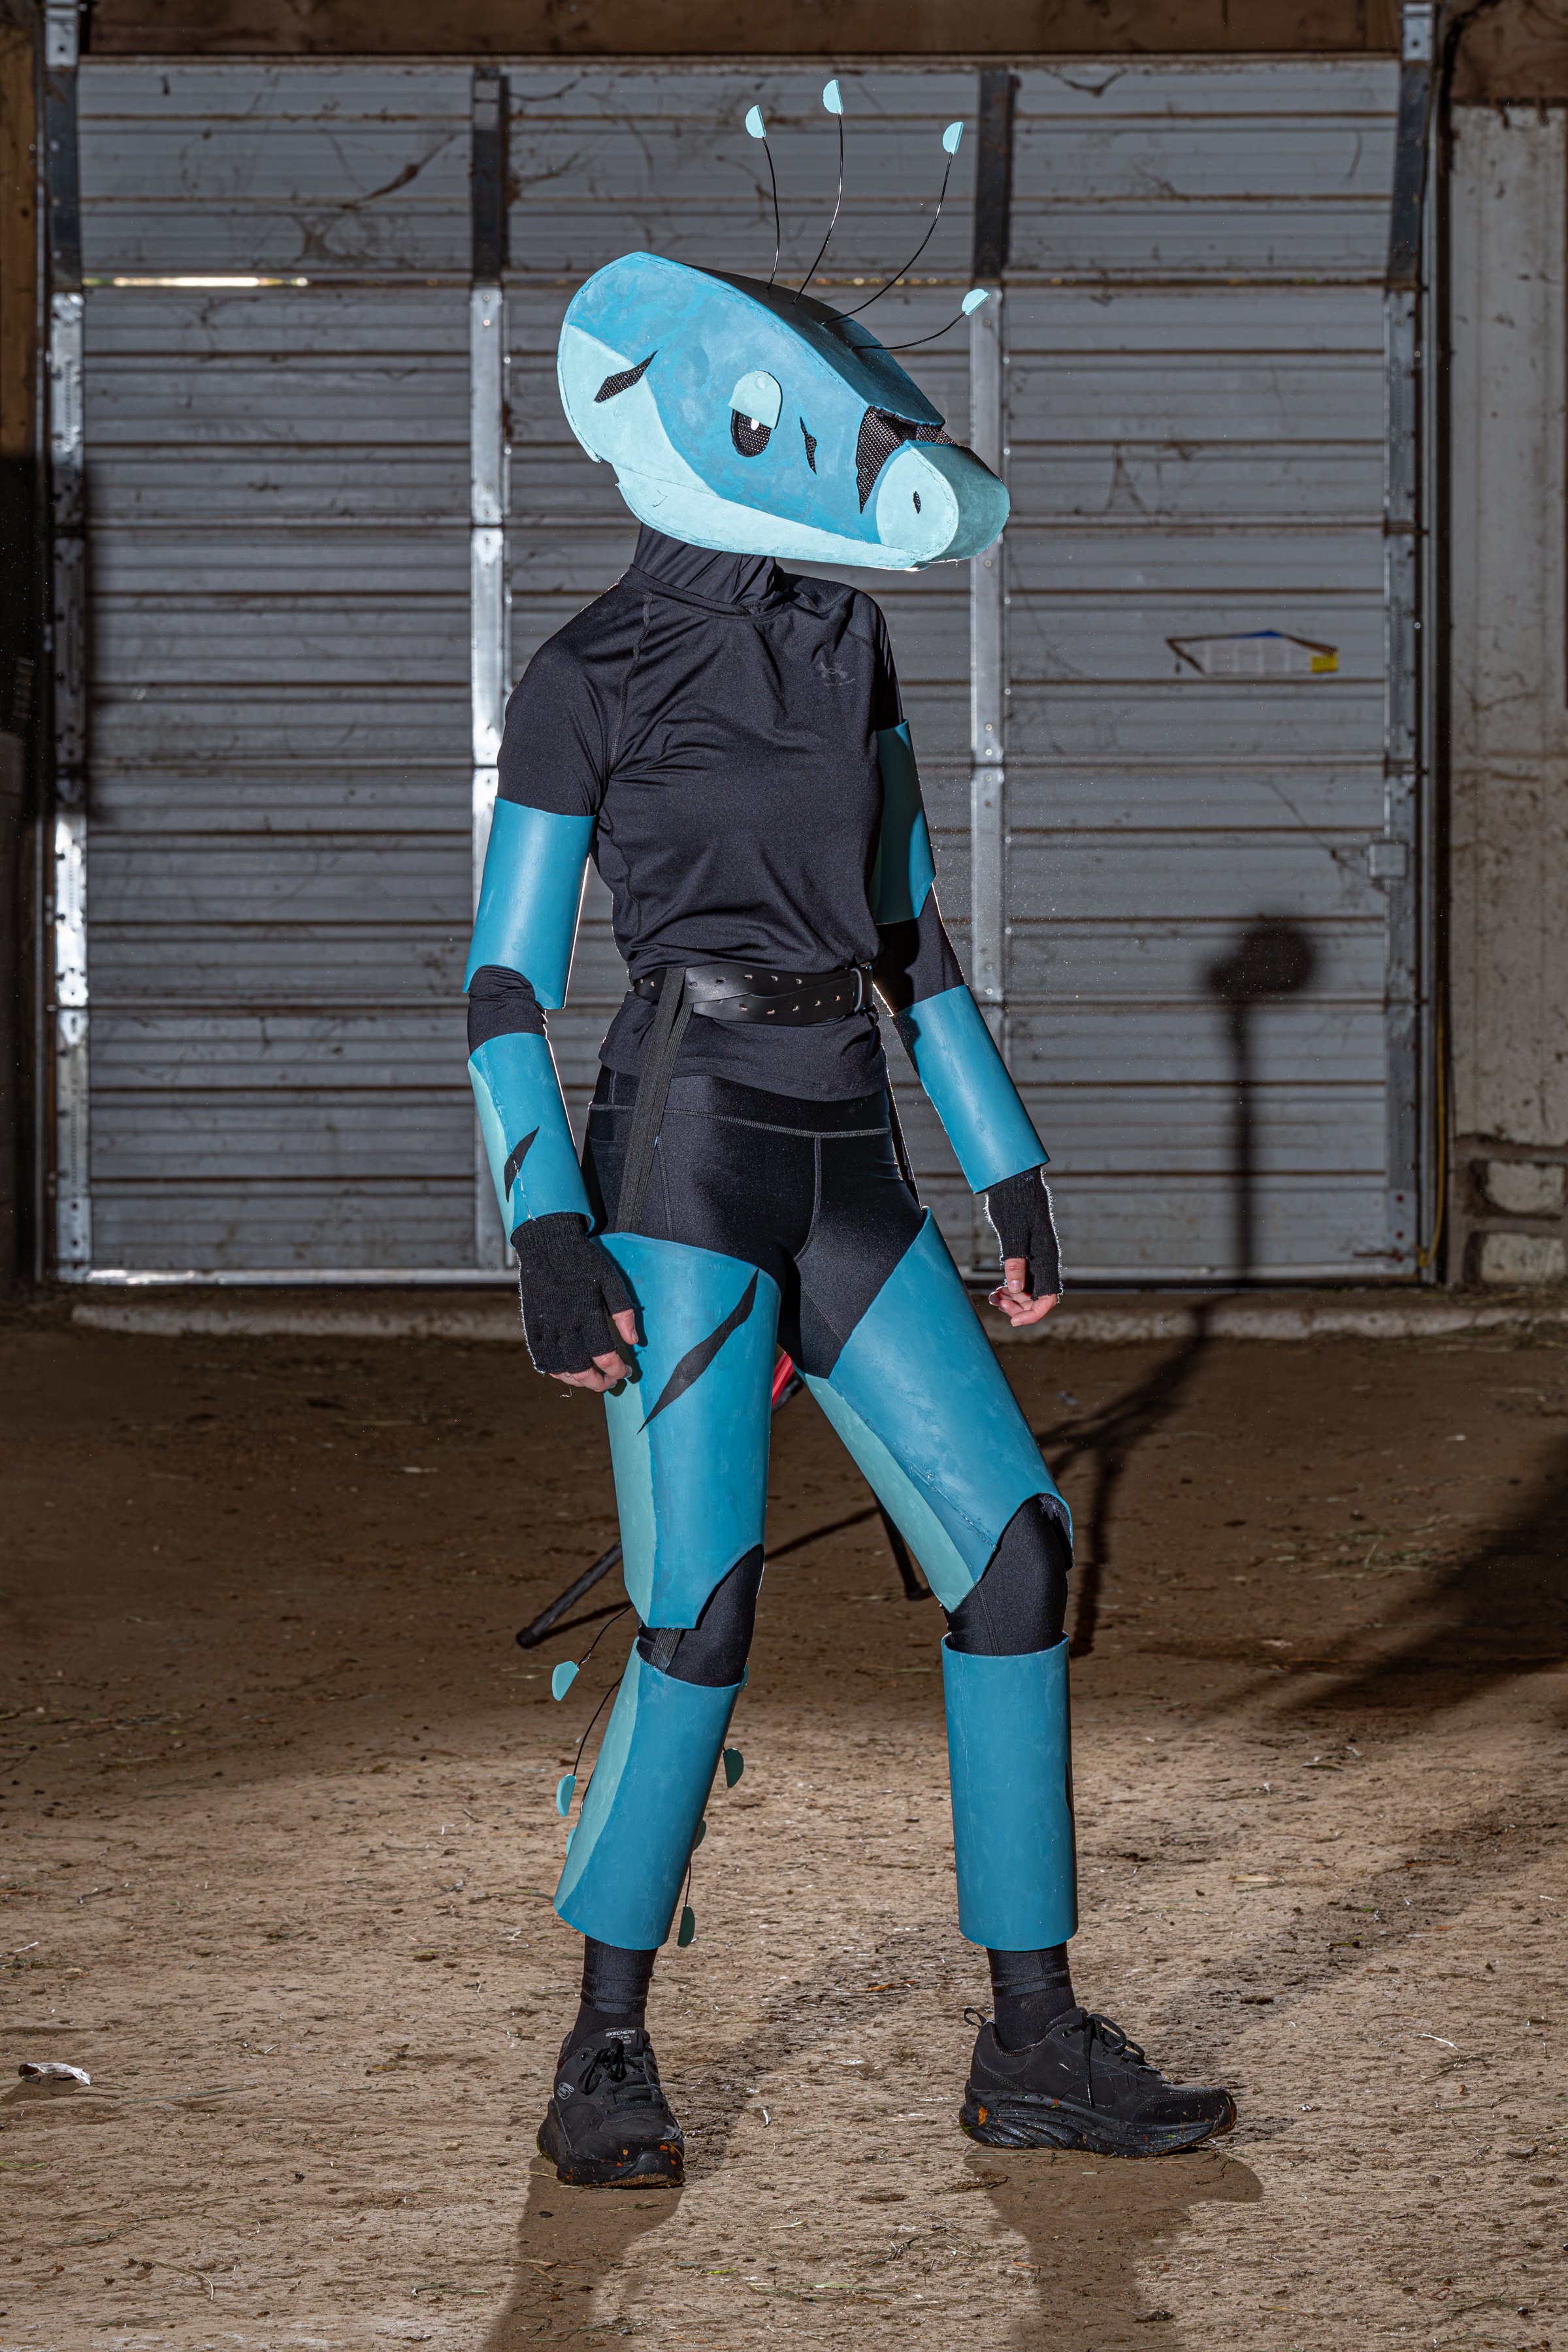
0-V’s story ends on October 26th of 2025, the day of my first professional photoshoot, where his portfolio photos come from. It was a bit bittersweet, wearing him to his last “event,” but truthfully, it was time. His leg and arm pieces had grown wrinkled and worn, his tail, I’ve been shocked it hasn’t fallen apart, and his head quills were beginning to leave holes in his head.
So, enough backstory, how was 0-V actually brought to life?
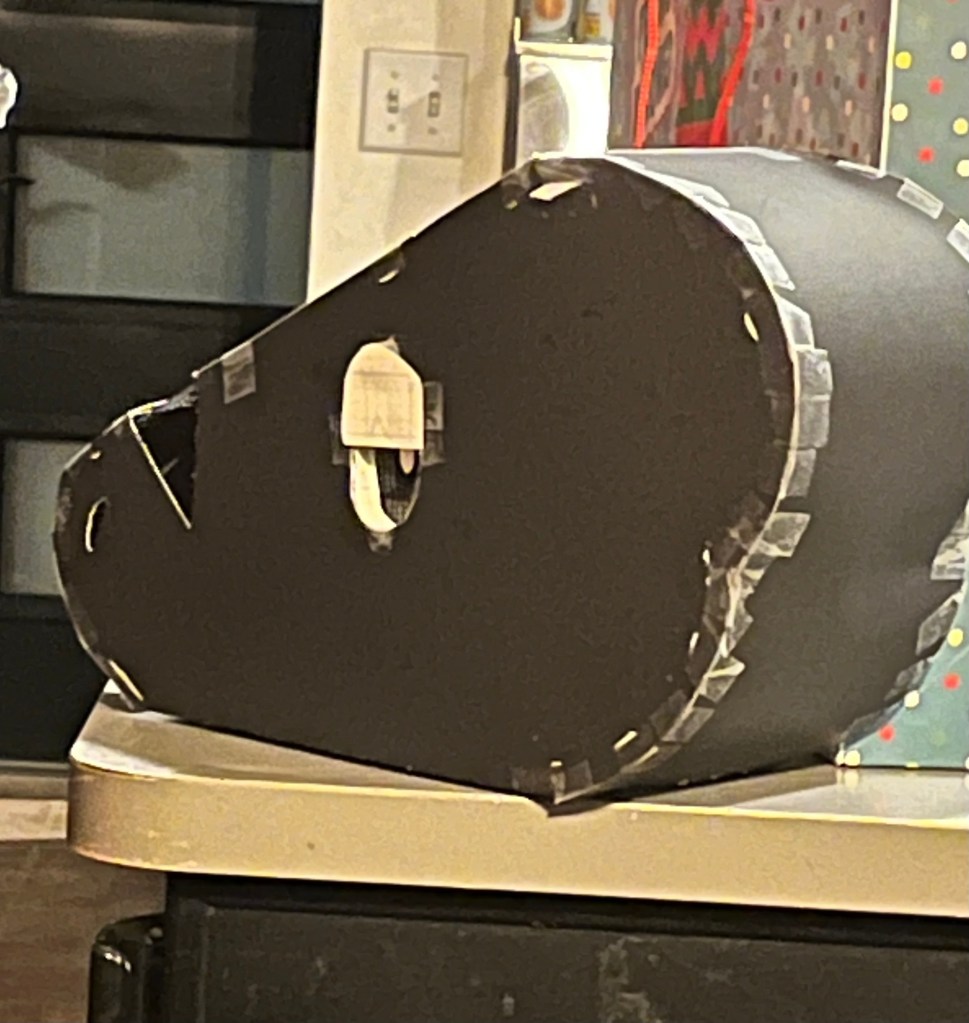
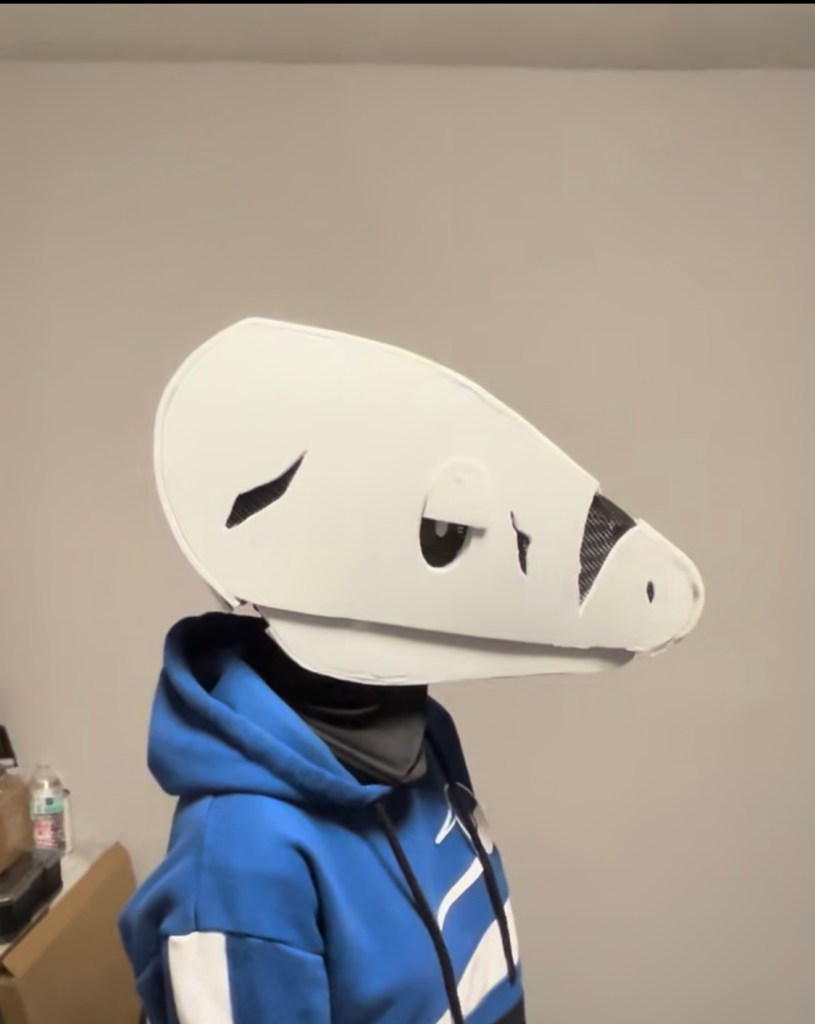
First I made a prototype out of cardstock. A model head I could wear and eventually use as a pattern. This was then torn apart, and, as I said, used as a pattern to cut out 5mm thick EVA foam sheets. 1 The left and right side of his head were just flat pieces, that I hot glued2 the curved “top” piece to, creating the shape of his head. 0-V actually sits on my head with the addition of a construction helmet interior piece3, you know, the straps that you can adjust? I just hot glued it to the inside. It’s very comfortable. His eye holes were cut out, and another strip of EVA foam was used for each eye. These strips were glued around the edges of the eye holes, perpendicular to the interior wall of the head. Black screen mesh was then glued onto the strips, and a small EVA foam oval was glued in the center. This is an age-old trick to give cosplays “follow-me eyes,” giving the illusion that a costume’s eyes are always following you. The snout tear and nostrils were also cut out and replaced with mesh, the snout tear being my primary viewing window. The nostrils don’t really do anything, honestly. The tear on the back of his head also has mesh, which really just helps with humidity if anything. The quills on top 0-V’s head are just pieces of black armature wire4 that I skewered some EVA half circles onto, the quills I put through small holes on the top of his head and twisted the bottoms of before gluing in. The armature wire lets me pose the quills if desired. 0-V’s eyelids are removable with simple neodymium magnets5. Similarly, the lower jaw I originally wanted to move with my own jaw, but because where the jaw hinged was behind where my jaw hinged, it wouldn’t have been possible in the tight timeframe I had to get this cosplay done in. I likely would have needed a more complicated mechanical system to achieve the effect. So, in a moment of defeat, I glued three magnets to the inside of the upper jaw and three magnets on the inside of the lower jaw. So the lower jaw snaps in place, this allows me to take the head on and off, and if I so desire, I can open up the jaw for cool shots or if I have to navigate an escalator!
His arm and leg pieces weren’t hard to make either, I really just measured and made a bunch of different shapes until I found ones I liked and repeated the processes above. The thigh and calf pieces are connected at the knee with elastic bands6, and the thighs have elastic band loops that a belt goes through to hold everything up. The arm pieces are essentially stuffed on, with polyfill 7filling out the space between my arm and the tube. I realize now that a more effective method to create this effect would be to glue upholstery foam to the interior. For his tail, I bought what I thought were black foam tubes8. Only to find out they were actually cut in half…so I glued the halves together to make actual tubes and connected said tubes in the center with a piece of armature wire. The quills were handled exactly the same. The tail loops onto a belt with a small piece of elastic.
That is how 0-V was constructed…painting him was far easier. First, I primed him with acrylic gesso9…an interesting but surprisingly effective choice. After he was prepped, I color dropped his color palette from his reference sheet onto a separate procreate canvas and printed it out so I could color match acrylic paint10 as closely as possible. Then it was just a matter of painting down the base coats and going over to make more tears I wasn’t able to actually cut out with black paint.
That concludes all I have to say about 0-V. I hope to make a second version of him sometime in the future, one that is 3d modeled and printed with hopefully electronic (or animatronic) features. Below is the gallery of 0-V’s photos!


Materials used:
